By allowing users to create documents from document templates you ensure that your documents comply to the organization’s graphical profile, that they get a consistent look and feel and that they contain the right content. By configuring MetaShare to also show suggested document templates, it becomes very easy for the end users to create new documents. By creating documents from MetaShare you also ensure that your documents are stored in SharePoint, from the beginning of the document’s life cycle, instead of them ending up in the end users’ desktops.
These are things you need to do to configure MetaShare to manage document templates:
- Create a document template library for MetaShare’s document templates and define the path to this document library in MetaShare (see requirements and instructions on this page).
- Upload the document templates to this document library.
- Optionally you can configure suggested templates by following these instructions.
How to upload the document templates to the template library
If you don’t know where the templates are located, you can open the location by clicking on the “Manage document templates” button in MetaShare’s general settings:
If no library is defined in the “Document template library” field, you first need to create and define the document templates’ library.
Document templates need to be uploaded to the templates’ library. If the templates are located in a MetaShare workspace, you can upload them using MetaShare’s upload function, else you upload them using SharePoint’s upload function.
To minimize the amount of templates shown in MetaShare, when using the create document function, document templates can be uploaded to sub-folders with specific permissions in the templates’ library. All documents in these folders will then inherit the permissions of the folders and when users from MetaShare later create documents, they will just see the templates that they have permissions to.
Templates in the library can be of the following types:
- Template-files from Word, PowerPoint and Excel, with these file-extensions:
- dotx (new documents will get the extension of docx)
- potx (new documents will get the extension of pptx)
- xltx (new documents will get the extension of xlsx)
- Regular documents of any other extension (new documents will get the same extension as the templates have).
If you have set the templates’ library to be an organizational assets library, making it possible for the MetaShare templates to also be available from Office applications, then the templates should be “real” document templates (.dotx, .potx, .xltx).
How to manage the document templates
Use cases when working with document templates in the the templates’ library are:
- Adding new document templates:
- Upload the new documents to the library and give them meaningful names.
- You might now want to define where these templates should be set as suggested templates.
- Update existing document templates using any of these methods (in both cases the updated templates will be available directly, without any delay or further actions):
- Upload updated documents to the library (see to it that they have exactly the same file-names as the templates you want to replace).
- Open the document templates from the document library, edit them and save them.
- Remove document templates:
- Mark the document templates and delete them.
Note
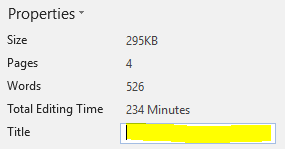
- The document template’s “Title” field is copied when creating a document from template. The recommendation is therefore to empty this field. This can be done by:
- For Office documents:
- Click on the document’s “File” tab
- Select “Info”, on the left navigation
- Clear the “Title” property, under the “Properties” section:
- For other document-types you can clear the corresponding “Title” column from SharePoint (if the Title columns is hidden, make it first optional or mandatory).
- For Office documents:
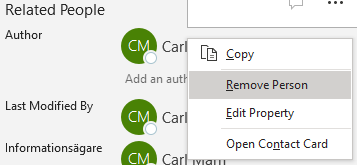
- The person that created an Office document is added to the document’s “Authors” field. This field is also copied when creating new documents from the template. The recommendation is therefore to also empty this field. This is done by:
- Click on the document’s “File” tab
- Select “Info”, on the left navigation
- Under the “Related People” section, select the author you want to delete and select the “Remove Person” option: